


Mounting, updating, and unmounting are the three phases that make up a React component’s lifetime. Each phase has unique methods in charge of a certain stage in a component’s lifetime. Technically, these react component lifecycle approaches are exclusive to class-based components and are not meant for functional components. The React component lifecycle and the many methods within each phase (for class-based components) with react native application examples are covered in more detail in this guide, with an emphasis on methods and hooks. So, enjoy reading and feel free to add your suggestions.

What Are The React Lifecycle Methods?
The three lifecycle method categories are mounting, updating, and unmounting. When a component renders for the first time, it mounts. The mounting lifecycle procedures are invoked at this response point. A component instance does not update when it renders for the first time. A component updates each time it renders as of the second render.
When a component is deleted from the DOM, a time known as the unmounting period begins. This can take place if the DOM is rerendered without the component, the user switches to another website, or the browser is closed.
Thus, the lifecycle of a React component involves three stages: mounting, updating, and unmounting.
- A new component is produced and added to the DOM during the mounting step, which also marks the start of a component’s life. This is frequently referred to as the initial render and can only occur once.
- The component updates or re-renders during the updating process. When the state or the props are updated, this reaction is triggered. Multiple occurrences of this phase are possible, which is sort of React’s purpose.
- The unmounting step, in which the component is taken out of the DOM, is the final stage of a component’s lifetime.
For each stage of the lifecycle, you can call a different method in a class-based component. These lifecycle methods, which can only be written or contained within a class, are obviously not applicable to functional components. React hooks, on the other hand, allow functional components to use states. Because they make working with React simpler and frequently less verbose, hooks are becoming more and more popular.
Mounting Phase
Component classes can use componentWillMount(), render(), and componentDidMount() to mount components in React. The render() method is called first, then componentWillMount(), then componentDidMount() is called last.
Updating Lifecycle Method
ShouldComponentUpdate() is called when a component updates, following componentWillReceiveProps() but before rendering starts. NextProps and NextState are the two arguments that are sent to it automatically as one of react lifecycle methods.
Either true or false should be returned by shouldComponentUpdate(). It is preferable to only have this method return false in specific circumstances. Your component won’t update if those criteria are true.
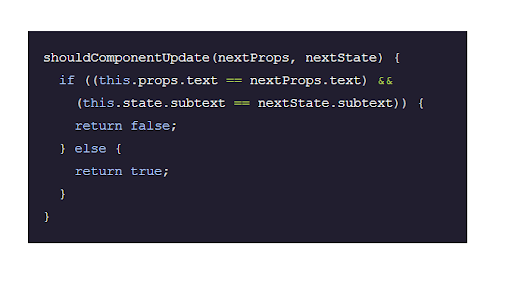
Source: codecademy.com
The Constructor Method
A particular method called a constructor generates an instance of a class. Typically, constructor methods receive input arguments to initialize the object and assign the data contained in properties.
When the component is first built, the constructor() method is called. It is used to bind methods to the component’s instance and initialize the component’s state.
When an object is created from a class, the React Constructor method is immediately invoked. Simply told, the constructor is an excellent tool for building things, as implied by its name. To learn more about the React usereducer, click here.
Before a React component is mounted, its constructor is invoked. You should always call super(props) in the constructor of a React.Component subclass before making any other statements. In the constructor, this.props will be undefined if not, which may result in errors.
The static getDerivedStateFromProps method
In situations where a component’s state is dependent on changes to its props, the getDerivedStateFromProps() method is employed. A static method named getDerivedStateFromProps(props, state) is called right before render() in both the mounting and updating phases of React. It uses the most recent arguments and the situation as support.
A state is referred to as derived when a prop is used to start it. The prop, which the state utilizes to determine its default value, can be viewed as a data dependence.
The derived state in React is implemented using standard JavaScript. This is an easy illustration. Declare the derived state above the JSX if it is used more than once. Call a function if you need to do a complicated task with this component lifecycle react.
Here is an example of a derived state in React:
e.g: const firstName = useState(‘John’); const lastName = useState(‘Doe’); // fullName will be re-calculated only when firstName or lastName changes const fullName = useMemo(() => `${firstName} ${lastName}`, [firstName, lastName]); Derived state is a state which mainly depends on props.
The Render Method
The only mandatory function in a class component in React is render (), which is in charge of describing the view that will be displayed in the browser window. There are some intricacies in how this react component lifecycle methods function, especially when combined with the ingenious way React works with its virtual DOM notion.
The most popular lifecycle method is render(). It can be found in all React classes. This is so because a class component in React can only have one necessary method: render(). It enables managing the rendering of your component to the UI, as the name implies.
For example:
class SubmitButton extends React.Component {
render() {
return (
<button
type=”submit“
style={this.props.styles}
>
{this.props.child}
</button>
);
}
}
Source: Retool.com
The ComponentDidMount() method
This function is invoked once each element on the page has been appropriately rendered. This method is used by React itself to either collect data from an external API or carry out some special online activities that require the JSX components after the markup has been placed on the page.
Updating Phase
React components are capable of changing the state within react native lifecycle. We almost always use state in each react component to make the React applications interactive. The state of the component is initialized with a certain value, and using the setState method, we periodically change it based on user interaction with the application.
Event handlers, server responses, or changes to a prop can all cause state to be updated. The setState() method is used to accomplish this in react native component lifecycle. The setState() method informs React to re-render the component and its descendants with the changed state by enqueuing all of the state updates performed to the component.
The static getDerivedStateFromProps
A static method named getDerivedStateFromProps(props, state) is called right before render() in both the mounting and updating phases of React. It uses the most recent arguments and the situation as support. Because it is static, getDerivedStateFromProps prevents any unintended consequences from occurring while rendering.
Both during the initial mount and any subsequent changes, the call to getDerivedStateFromProps is made immediately before invoking the render method. To change the state, it should either return an object, or null to update nothing.
This technique is available for uncommon use scenarios where the state depends on changes in props over time. It might be useful, for instance, when implementing a “Transition” component that selects which of its children should animate in and out by comparing those who came before and after it.
Syntax:
static getDerivedStateFromProps(props, state)
The getSnapshotBeforeUpdate method
The most recent rendered output is committed to, for example, the DOM, just before the call to getSnapshotBeforeUpdate() is made. It enables your component to obtain some DOM data, like as the scroll position, before it might be altered. ComponentDidUpdate() will receive any value this lifecycle function returns as an argument.
Although this use case is uncommon, it could appear in UIs like chat threads that must manage scroll position specifically.
Returning a snapshot value (or null) is required.
Syntax:
getSnapshotBeforeUpdate(prevProps, prevState)
For example:
class ScrollingList extends React.Component {
constructor(props) {
super(props);
this.listRef = React.createRef();
}
getSnapshotBeforeUpdate(prevProps, prevState) {
// Are we adding new items to the list?
// Capture the scroll position so we can adjust scroll later.
if (prevProps.list.length < this.props.list.length) {
const list = this.listRef.current;
return list.scrollHeight – list.scrollTop;
}
return null;
}
componentDidUpdate(prevProps, prevState, snapshot) {
// If we have a snapshot value, we’ve just added new items.
// Adjust scroll so these new items don’t push the old ones out of view.
// (snapshot here is the value returned from getSnapshotBeforeUpdate)
if (snapshot !== null) {
const list = this.listRef.current;
list.scrollTop = list.scrollHeight – snapshot;
}
}
render() {
return (
<div ref={this.listRef}>{/* …contents… */}</div>
);
}
}
Source: legacy.reactjs.org
The shouldComponentUpdate method
React’s shouldComponentUpdate lifecycle function. When a component’s state or props change and those changes have an impact on the output, this method forces the component to re-render.
When new props or states are being received, the shouldComponentUpdate() method is used before rendering an already mounted component.
Syntax:
shouldComponentUpdate(nextProps, nextState)
For example:
import React, { Component } from ‘react’;
import “./styles.css”;
class App extends Component {
constructor() {
super();
this.state = {
value: 0
}
}
shouldComponentUpdate(prevProps, prevState) {
if (prevState.value !== this.state.value) {
return true;
}
else {
return false;
}
}
render() {
console.log(“Inside render”);
return (
<div className=”App”>
<h1>Component : {this.state.value}</h1>
<button onClick={() => {
this.setState({ value: this.state.value + 1 })
}}>Update</button>
</div>
);
}
}
export default App;
The componentDidUpdate Method
The final lifecycle method used during the update phase is the componentDidUpdate method. By using it, you can produce unintended consequences like launching network requests or invoking the this.setState method. It’s critical to keep in mind that if the setState isn’t always possible to avoid (via logic, for example), rendering will continue indefinitely.
If the getSnapshotBeforeUpdate method is used, this function can accept up to three parameters: prevProps, prevState, and snapshot.
Unmounting Phase
Before the component is deleted or unmounted from the DOM tree, this method is invoked during the unmounting step of the React Lifecycle. All of the subscriptions that were previously formed in the componentWillMount function are mostly canceled using this method.
When a component is unmounted, as React likes to refer to it, it enters the lifecycle’s next stage. When a component is unmounted, React’s sole built-in method is called: componentWillUnmount()
The componentWillUnmount Method
So, just before the component is unmounted or deleted from the DOM, componentWillUnmount is called. It is intended for any necessary component cleanup, such as terminating network requests or unsubscribing from subscriptions (such as Redux). The component will be destroyed after this method has completed its operation.
Error handling phase
The routines in software that react to unusual input or circumstances are referred to as error handling. The clarity of each error message and the options provided to users for fixing the issue determine the quality of such processes.
Each error must be found, reported to the user, and then a recovery strategy must be developed and put into action to deal with the error. The program’s processing speed shouldn’t be slow throughout this entire process.
The getDerivedStateFromError() Method
If an error develops while any lifecycle method or any of its descendants components are drawing, the getDerivedStateFromError() method is called. The Error Boundaries are implemented for the React application using this function. Side effects are not allowed because it is called during the render stage.
Syntax:
static getDerivedStateFromError(error)
For example:
import React, { Component } from ‘react’;
export default class App extends Component {
// Initializing the state
state = {
error: false
};
static getDerivedStateFromError(error) {
// Changing the state to true if some error occurs
return {
error: true,
};
}
render() {
return (
<React.StrictMode>
<div>
{this.state.error ? <div>Some error</div> : <GFGComponent />}
</div>
</React.StrictMode>
);
}
}
class GFGComponent extends Component {
// GFGComponent throws error as state of GFGCompnonent is not defined
render() {
return <h1>{this.state.heading}</h1>;
}
}
Source: Geeksforgeeks.org
The componentDidCatch() Method
If a problem arises during the rendering stage of any lifecycle methods or any children components, the componentDidCatch() method is called. The Error Boundaries are implemented for the React application using this function. Contrary to getDerivedStateFromError(), which was called during the render phase, this function is called during the commit phase, therefore, side effects are permitted. Errors are also recorded using this technique.
Syntax:
Component Did Catch (Error, Information)
Parameters: It accepts the following two parameters: error and info:
error: This is the error the descendant component threw.
information: It saves the componentStack trace of the offending component.
React Native Lifecycle Hooks
React Native has hooks, react lifecycle hooks are methods that are automatically invoked at each stage of the lifecycle and provide you effective control over what happens at that stage. You will be able to successfully control and manipulate what occurs in a component throughout its lifecycle if you have a solid understanding of lifecycle hooks react.
React Native useState hook
We can keep track of the state in a function component with the React useState Hook. State generally refers to information or characteristics that applications need to track. To use this useState Hook, we first need to import it into our component.
For example:
At the very top of your react component, import the useState Hook.
import { useState } from “react”;.
For example:
At the top of your component, import the useState Hook.
import { useState } from “react”;
React Native useEffect hook
This one can be utilized to maintain track of any combination of these, including strings, numbers, arrays, and objects.
To track different values, we may make several state hooks.
For example:
Create multiple state Hooks:
import { useState } from “react”;
import ReactDOM from “react-dom/client”;
function Car() {
const [brand, setBrand] = useState(“Ford”);
const [model, setModel] = useState(“Mustang”);
const [year, setYear] = useState(“1964”);
const [color, setColor] = useState(“red”);
return (
<>
<h1>My {brand}</h1>
<p>
It is a {color} {model} from {year}.
</p>
</>
)
}
const root = ReactDOM.createRoot(document.getElementById(‘root’));
root.render(<Car />);
React Native useContext hook
To manage state at the global level, use React Context. It works better when combined with the useState Hook than it does on its own for sharing state between deeply nested components. The stack’s topmost parent component needing access to the state should hold it.
We have numerous nested components as an example. The stack’s top and bottom components both require access to the state.
Example: import { useState } from “react”;
import ReactDOM from “react-dom/client”;
function Component1() {
const [user, setUser] = useState(“Jesse Hall”);
return (
<>
<h1>{`Hello ${user}!`}</h1>
<Component2 user={user} />
</>
);
}
function Component2({ user }) {
return (
<>
<h1>Component 2</h1>
<Component3 user={user} />
</>
);
}
function Component3({ user }) {
return (
<>
<h1>Component 3</h1>
<Component4 user={user} />
</>
);
}
function Component4({ user }) {
return (
<>
<h1>Component 4</h1>
<Component5 user={user} />
</>
);
}
function Component5({ user }) {
return (
<>
<h1>Component 5</h1>
<h2>{`Hello ${user} again!`}</h2>
</>
);
}
const root = ReactDOM.createRoot(document.getElementById(‘root’));
root.render(<Component1 />);
Without Context, we must transmit the state as “props” via each nested component in order to accomplish this. “Prop drilling” is the term for this.
Fireart Expertise
React JS Development Services we provide will be a great support during your app development on all software lifecycle stages. Fireart is the design and software development studio of full cycle. Having more than 50 react and other specialists on staff, they have more than seven years of expertise creating new React digital projects or updating old ones. So, you may easily entrust some complex development issues to the team in no time. With the introduction of the latest React technology, programmers can now use Hooks to create tasteful functional components, which reduces verbosity in class-based components and makes the code easier to write and read and your projects’ backend – clear and complete.
Conclusion
A component’s lifetime in React consists of three distinct phases. Mounting, updating, and unmounting are these phases. The lifecycle methods that are triggered throughout each phase allow you to work on various aspects of the component, like as its props and state, or to actually mount the component to the DOM (using the render method). These techniques, however, are only applicable to class-based components. Feel free to use React Native lifecycle hooks to improve your app project characteristics if necessary. Consult specialists in case you experience hardships with any software development react lifecycle phase.
Need a React Native engineer to reinforce your team? Contact us today!


